Friday, September 25, 2015

No Bake Granola Bars

I don't know why I have been putting off making these for so long. I guess I thought it was going to be a much more labor intensive process than it was. I mean, they're NO BAKE! Seriously, what was I thinking? Once again I am proven wrong by none other than myself.

I doubt the whole process took me any longer than 30-40 minutes. The only part that took the longest was pitting and chopping the damn dates. That was a pain in the ass. And so sticky. After I was done chopping, I felt like Clark Griswold in Christmas Vacation when his sap-laden hands stick to everything...

Little full, lotta sap.

Ready to see how incredibly simple these are to make? 1, 2, 4, GO

No Bake Granola Bars
Makes about 30 bars

2/3-1 C chopped nuts (peanuts, cashews, almonds, walnuts, pine nuts etc etc)
1 1/2 C oats
1/4 C flax seeds
1/2 C dried cranberries, or other dried fruit of your choosing
16-20 pitted and chopped dates
1/4 C honey
1/2 C oil
1/2 tsp salt
1 C nut butter

Combine all dry ingredients together in a mixer and mix until just incorporated.


While mixing, drizzle in the honey, oil and nut butter.

When all ingredients have combined nicely, turn out into a wax/parchment paper lined baking sheet.

Using a spatula, slowly spread out and firmly tamp down the mixture until it's an even layer, reaching all the way to the corners of the sheet.


Refrigerate for 2 hours. Cut into desired size; I used a pastry scraper to do this.


Store in an air-tight container, using wax paper to separate each layer.


Eat and enjoy with coffee or tea


The *only* problem I have with these is you have to keep them refrigerated until you're ready to eat them or they turn into a gooey granola mix basically, as handsome learned the hard way. I suspect it has to do with the extra creamy natural peanut butter I used, buuuut it was all I had on hand so I went with it. Next time I will try my standard sunflower seed butter and see if they fare any better. Because handsome wakes up at an undogly time of the morning (see what I did there?) and has to grab breakfast on the go, I really want these granola bars to stay in, ahem, bar form until he's ready to eat.

As I have added these to my weekly prep, I will be experimenting with different ingredients/methods and will update accordingly.

Until next time, cheers!


Saturday, September 12, 2015

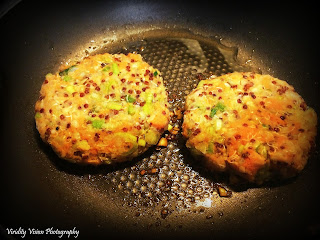
Homemade Sweet Potato and Quinoa Veggie Burgers

I'll be the first to say, these are some of the most delicious burgers I've ever had... and there's not a hint of meat or eggs to be found. Hell, I'll even stack them up against a cheeseburger any day. Okay, maybe not a *bacon* cheeseburger, but they're pretty damn delicious.

As with everything I've been making recently, I have tested and developed my own recipe for these delicious patties of heaven. Mostly out of necessity.But it's oddly satisfying going through the researching, looking up various ingredients, taking a piece from that recipe, an ingredient from this recipe, until I have something I think will pull together nicely.

The thing I love about this particular recipe is that it is so versatile, so much so I should really call them kitchen sink veggie burgers. I've swapped black beans for garbanzo beans, diced up leeks instead of onion, add extra or different peppers depending on how spicy I want them, throw in some diced mushrooms if I have any on hand, so on and so forth.
The first veggie recipe I ever made after we went vegetarian was... meh at best. The patties fell to pieces on the grill and we had basically veggie burger crumbles. The two patties that actually made it to the finish line didn't really win the race either. With every bite, more and more of the patty would ooze out on all sides of the bun. 
So I was determined to figure out why, and ended up making veggie burgers probably 4 more times after that over the course of 2 weeks. And surprisingly enough, we still like eating them! Handsome tells me this is by far his favorite version yet, so we're sticking with it. And look at how helpful he always is, I can't say no to that face! 

Sweet Potato & Quinoa Veggie Burgers
Makes about 10-12 patties

1 sweet potato, cooked and mashed
16oz (2 cups or one can) chickpeas, mashed
1 cup quinoa, cooked and strained of any excess water
1/2 onion, diced OR one bunch diced green onions
1 leek, diced
1/4-1/2 cup corn meal, panko or ground oats 
4-8 garlic cloves, diced
2-4 peppers, diced (anaheim, jalapeno, etc)
5-10 crimini or other mushroom, washed and diced
1-2 tsp nutritional yeast
2-3 Tbs coconut oil
To taste: salt and pepper

Pierce your sweet potato and put it in the over at 400 degrees for about an hour, rotating half way through. Even tho the recipe calls for one, I recommend making more than one at a time so you have cooked sweet potato ready to go for other recipes. 

Cook quinoa according to package instructions, usually 2 cups water to one cup (rinsed) quinoa, bring to a boil then simmer with a lid on for about 15 mins or until they have sprouted and the water is gone. Strain and let cool for a little bit.
If you're using canned beans, drain and rinse them. If you're using bulk beans, they will already need to be soaked, rinsed and cooked. Toss them in a blender and pulse until they're 'riced'.
Dice up your various other veggies: leeks, onions, peppers, garlic cloves, and whatever other veggies you'd like to add such as mushrooms if you have them on hand. Then dice up some variation of pepper, for us it's whatever we can pull from the garden or what friends bring over (anaheim, jalapeno, etc.). 
Add all this to your bowl or mixer and pulse once or twice. Add cup panko/cornmeal/ground oats, nutritional yeast, dash of salt and a few dashes black pepper. 

Mix together until it starts to stick together. If you're using a mixer, set it on the lowest setting and drizzle oil while it mixes. If you're mixing by hand, add 1 Tbs of oil at a time until it sticks together and has a nice smooth consistency.
Form your patties and place on a lined tray, cover and put in the fridge for an hour. Then store in an airtight container for up to a week, or freeze for, I don't know.. a while. They typically don't last long in our freezer so I couldn't tell you how long they keep in the freezer, but my adult logic tells me probably some time. 


When you're ready to cook them, either slap those puppies on a well oiled grill or a well oiled pan (preferably cast iron) for about 3 minutes each side, or until nice they're nice a crispy. Put that between two whole wheat buns and add your favorite toppings or condiments. I love using kale instead of lettuce because the warm burger will steam it and give you a nice texture. 


If you try these with different ingredients than listed above, let me know what you use and how it turns out! Thanks for stopping by, cheers!


Friday, September 4, 2015

Vegetarians Do It Better

Veggies. It's a love/hate relationship for most of Americans. Even though it's supposed to make up 60% of our diet and meat only a mere 5%, it's woefully the opposite. Meat and carbs overtake many the American meal, actually pretty much all of the meals a typical American eats. There's meat and bread in every single meal we consume, because we've been groomed to eat that way for so long. Sure, we KNOW that fruits and veggies are good for us and we are supposed to eat 3-5 servings a day, but they rarely make it on the plate. Or when they do, they're usually drenched in butter, cheese, sauce, or processed to hell so none of the original nutrients actually make it to your plate or body.

I can go on and on about my personal belief and anger over the food industry, marketing scare tactics and absolute misinformation about what constitutes a healthy diet, but I don't want to be on my soap box that long.

I'm not one of those people that hates veggies; I really never had a problem clearing my plate when I was growing up. I absolutely love veggies. The colors. The variety. The uniqueness. The artistic structure, inside and out. The only problem was I haven't been getting enough of them in recent years, probably for a very long time. As a typical American getting sucked into the typical American diet, my meat to veg ration was horribly skewed. I knew I needed to start making changes, and I did, very small ones over the course of a number of years.

I switched from white to wheat, from olive to grape oil, packaged/quick food to making my own, bringing my own coffee and lunches for work. Several years ago I stopped eating fast food (except on those ridiculously late, drunken Taco Bell runs when I'm starving and don't care how much processed cheese product I shove into my mouth).
Recently, handsome and I watched a documentary on Netflix that really opened our eyes and thrust us into a completely new lifestyle. It was chance thing that led us to make an easy choice to go vegetarian. I know what you might say about the nature of humans to get all gung-ho and motivated after they see/watch/read something only to fizzle out after a few days because of our inherited short attention spans. But this lifestyle change, while radical to many, was actually one of the easier changes I've made. I don't miss the taste of meat and the last time I had a bite of something with hamburger in it, I didn't care for it.

Handsome pointed out the other day that he feels like he can taste the veggie flavor more than ever before and it's completely true. No longer are our veggies sauteed in ground turkey drippings or slathered in meat sauce. The true veggie flavor comes through in all our dishes and I can't believe we've been missing out on this taste for so long. It just reinforces the fact that I love cooking, now more than ever. It's been fun as hell trying so many new recipes or variations of old recipes. In fact, most of the time I find myself creating my own recipe based on what we have on hand, something I've always wanted to do but never had the confidence.

Even though we are just two people, I feel satisfied that we are doing our small part to reduce our footprint, save forests, conserve water, prevent our own high blood pressure and cholesterol, and lose a little weight along the way. And I am so excited for us to continue this journey together, learning and experimenting with new things along the way.


Friday, August 21, 2015

Dust

Wow. What a crazy past few years it's been since I have been here. Reawakening this blog has been something I've wanted to do for way too long. Brushing the dust off this blog has rekindled my passion for posting what I cook and photograph. Mostly, I was just so busy and, I'll admit it, lazy to take time and post my food journey.

What has happened in the past few years? I have been steadily cooking, increasing my food knowledge and skills. I went through a huge stage of finding myself and exploring who I really am, what I want in life, and who I want to be. I was in and attended countless weddings.

At one of those weddings,
I met and fell madly in love with my amazing other half, Eli. We went to our first Seahawks game together. I have suffered loss and heartbreaking pain. I have had amazing adventures and happy times. I became a (mostly) vegetarian. But, it's the experiences that shape you and let me tell you where I am right now, I couldn't be more happy and content because I am finally where I am in life and I'm finally who I want to be.


Getting back to my roots, in the garden and in the photography world, is something I am looking forward to an exceptional amount. I love taking pictures of the beautiful, colorful and unique ingredients Eli and I cook with. Dabbling in vegetarianism the past month has really opened our eyes to the incredible flavor that food has. And I don't ever intend on going back. I can't tell you how lucky I am to have such a perfect partner that shares my same values, goals, vision and willingness to try new things. I am so lucky to be in a place where we are able to purchase and grow beautiful, local produce. Finally, I am lucky to have the ability to voice myself on a public platform, and even if no one ever reads this I am still lucky!


Cheers to a beautiful life. Never stop appreciating what you have and if you don't appreciate what you have, never question yourself that you can change it.


Monday, November 19, 2012

Chipotle Shrimp w/ Cheddar Grits


Let me be the first to say that I heart my Everyday Food magazine subscription. I probably have ranted endlessly talked about this before. But, seriously, this is one of my favorite magazine subscriptions I have. And I have a lot of magazine subscriptions (thanks frequent flyer miles!).

 Over the weekend, I tried a completely new and different recipe than I normally wouldn't make: chipotle shrimp with cheddar grits. Now, I'm not normally one for spicy entrees. Call it a weird fear of not wanting my tongue to feel like it just licked the bottom element of a pizza oven. Lately, however, my curiosity has gotten the best of me-as it typically does- and I have been a little more open to trying to spice up my life (pun intended).  Or perhaps my amygdala is on the fritz.

And as with most of my shopping trips, I bought a slightly different product than what the recipe called for. It clearly states in the perforated shopping list so conveniently provided in the magazine that this recipe needs quick-cooking grits. What did I buy? Instant grits. Of course. For those of you who don't know the difference, it's like buying instant oatmeal when you need regular Quaker oats. Go. Figure. But, it all turned out in the end. Yay me.

Ingredients

3/4 cup quick-cooking grits
1/2 cup shredded cheddar (2 ounces)
Salt
3 Tbs unsalted butter, divided
1 bunch scallions, thinly sliced
1 chipotle in adobo sauce, seeded and chopped, plus 1 Tbs sauce
1/2 cup chicken broth
1 pound frozen large shrimp (31-35), thawed, peeled and de-veined (tails left on)
1/4 cup lime juice (roughly 2 limes)

Directions

In a medium pot, cook grits according to package directions. Stir in cheddar and season with salt. Because I bought instant grits instead, I just put 2 1/2 packets in a sauce pan and waited until the shrimp and broth was almost done. Then put in the boiling water according to the package directions, mixed it up a little and added the cheese.

Meanwhile, in a large skillet, melt 1 Tbs butter over medium heat. Add scallions, chipotle and chipotle sauce; cook, stirring until scallions are tender, about 4 minutes.

Add broth and bring to a simmer. Add shrimp and cook until opaque throughout, 3 minutes.
Stir in lime juice and remaining 2 Tbs butter and cook until sauce is slightly thickened, about 2 minutes.

Season with salt. Top grits with shrimp and sauce. Devour. Enter the yum.

I have to say, it was preeety damn good and not as spicy as I thought it would be. Probably because the chipotle was seeded. Just a guess. I could have just eaten the shrimp and broth, it was so tasty.


HOWEVER.. on the last damn shrimp, I was trying to wrestle the tail off, my fingers slipped on the saucy coating, thus catapulting said sauce into my eye. To which my eye angrily replied to my tongue "not that hot? NOT THAT HOT?" Yeah, so that happened. I'm still experiencing a residual burning sensation, 4 days later. But it was oh so worth it.


Wednesday, October 31, 2012

Happy Halloween!!

I love Halloween! I love carving pumpkins, dressing up and decorating in the most tacky way I know how. Plus it's just fun going into stores in full costume to get groceries, you don't get to do that everyday. 


Sunday, October 28, 2012

Banana Hazelnut Bread


 Now that I'm finally winding down from returning home, I seemed to have packed my plate full today with things to do. Why do I always do this to myself? First thing on the agenda: banana bread! I forgot to eat the last three bananas before I left to Nashville so when I returned home I had some pretty good candidates for bread. Darn.

While kind of watching football (Go Seahawks!) I started getting my hands dirty in the kitchen. I have no idea where my motivation came from..perhaps it was the three cups of coffee before 9 am. Quite possible. I also don't know where my sudden baking frenzy has come from the last few weeks but at least I have plenty of guinea pigs to feed my labors to so I don't eat it all. *Sigh* so much for trying to limit my sugar intake. 

Traditionally, banana bread is made with walnuts or almonds, but I have had this lonely jar of hazelnuts in my pantry for far too long that I decided to use instead. I never stick to a recipe anyway. Plus I have to save the rest of my almonds for the wine/cheese/almond plate that I will be treating myself to this afternoon once I get all my shit done. The only bad thing about using hazelnuts is the skins: hard to get off the whole nut and a real pain in the ass to remove from the pile after you've chopped them. Whatever. 

Here is the banana nut recipe, modified slightly from here

Banana (hazel)Nut Bread

1/4 c butter
1/2 c granulated sugar
1/2 c honey
2 eggs
1 1/2 c mashed, over-ripe bananas. I used three
1 1/2 c all purpose flour
1/2 tsp baking soda
1/2 tsp sal
1/2 sliced/chopped nuts 


Pre-heat oven to 350 degrees. Grease a 12 x 4 1/2 x 2 1/2 loaf tin, or three smaller loaf tins as I usually end up doing. The size of the tins I use is roughly 5 x 3 x 5.
Cream the butter. The original recipe said to use a wooden spoon, but I must not have the right kind of wooden spoon because it was way more cumbersome than it should have been so I just switched to a regular soup spoon.
Add the sugar and honey and beat until creamy and light.

Add the eggs, one at a time, then thoroughly mix in the bananas.

Sift together the flour, soda and salt and blend thoroughly into a mixture. 

Finally, fold in the chopped nuts.


If using more than one loaf tin, evenly distribute between pans. I found this recipe made the perfect amount to split between the three tins. 

Pop them in the oven and set a timer for 1 hour. The original recipe said to lightly cover the bread with foil so the top doesn't get too brown, but I didn't do this...mostly because I missed that part. But it turned out just fine. Plus, I'm a big fan of crispy crusts. Just makes a nice contrasting texture with the soft, moist inside of the bread. 

I think I'll make my self a pumpkin spice latte (aka drive my happy ass down to the nearest coffee establishment), grab a slice-or three- and sink into bliss before I'm off to the next, um, adventure... maybe I'll just take a bath first.


Thursday, October 18, 2012

Fall, In Love

I absolutely love this time of year. The colors. The leaves. The crisp air. The rain. The food. The wind blowing through the trees. The crunch of said leaves as I stomp through a parking lot. The puddles of rain on the side of the road I purposefully drive through. This is how I know I live in the perfect place for me. I just wish more people who lived here knew how lucky they truly are.


 Today, I went to our local pumpkin patch to pick out some punkins for Halloween. I was so excited! I'm leaving for a business trip this weekend and it's just cutting it too close if I go after I get back and I'm just not doing that to myself. There's just something special for me about going to do something I remember doing as a kid. Now I begin my own tradition as an adult I can hopefully pass down to my wee ones someday. Here are some of my favorite shots while I was out enjoying the patch.


Saturday, October 13, 2012

Plum Bread

But it should really be called YUM bread, because it's dangerously delicious. Like, I'm glad I don't have plum trees 'cause I'd eat this all the time and leave an ass groove in my couch, delicious.

I was lucky enough to get this recipe from one of my best friend's mom, after she brought over a loaf a few weeks ago that was almost instantly devoured-upon which I practically demanded she hand over the recipe. Have I mentioned this bread is delicious? Because it is. Anyway, her parents have a ca-shit-ton of plums right now because, well.. it's plum season, and they (fortunately) have plum trees. I was even GIVEN some of these detectable beauties when she brought over the recipe. Let's face it, I have some pretty awesome connections.

Because I didn't want this amazing fruit going to waste, I decided to make the plum bread today because the plums were starting to look pretty sad. And I don't want to attract fruit flies and this is practically an open invitation to invade our home. No thanks. So I took my glass of wine, grabbed the recipe, pulled out the ingredients and proceeded to make a mess of the kitchen.

I made a few variations to the recipe, like using vanilla yogurt instead of plain because that's what I had on hand. I replaced the one loaf pan with three smaller loaf pans. I also used my beloved Cuisinart (thanks Mom!) instead of an electric mixture because, again, that's what I had on hand. The Cuisinart actually worked quite well, except for the part where I had to muscle the batter out with a too-big-for-the-job spatula into another bowl to fold in the plums. Gah. I suppose I *could* have just stopped to grab a more appropriate utensil, but I was determined (or stubborn, whatever) at that point. And by god if I am going to dirty another dish. Hell to the no.


Plum Bread
as adapted from Mama Ardis, who originally got it here

1 1/2 cups pitted, chopped plums (I used about 15)
1 Tbs all-purpose flour
1/2 cup butter
1 cup white sugar
1/2 tsp vanilla extract
2 eggs
1 1/2 cups all-purpose flour
1/2 tsp salt
1/4 tsp baking soda
1/3 cup yogurt, plain or vanilla
1/4 cup brown sugar
Cinnamon


Preheat oven to 350 degrees F (175 degrees C). 
Spray a 9x5-inch loaf pan with cooking spray, or line with parchment paper. I used three smaller loaf pans. The size of the tins I use is roughly 5 x 3 x 5.  
Sprinkle chopped plums with 1 tablespoon of flour and a couple generous dashes of cinnamon in a bowl, toss to coat. Set aside. 

In a(nother) large bowl, beat the butter, white sugar and vanilla extract with an electric mixer (or Cuisinart) until light and fluffy. Beat in the eggs. 
In (yet) another bowl, sift together 1 1/2 cup of flour with salt and baking soda. 
Stir the dry ingredients into the egg mixture, alternating with yogurt until the mixture forms a smooth batter. 
Lightly stir in the flour-coated plums,and pour the batter into the prepared loaf pan(s). 
Sprinkle the top of the batter with brown sugar.
Bake in the preheated oven until a toothpick (or the nearest chopstick) inserted into the center of the loaf comes out clean, 45 to 50 minutes. 
If you use the three smaller loaf pans, it takes 40-45 minutes.
 Remove from oven and let cool in the pan 10 to 15 minutes before removing from pan for slicing.


Needless to say, the house smelled amazing and it's a good thing they got done baking a mere 30 minutes before dinner was ready, otherwise I might have just eaten an entire loaf to myself. I mean, just look at that beautiful brown sugar crust.. *drool*

Yeah, this one is definitely going in the favorites folder. 


Sunday, October 7, 2012

Can It: Stewed Tomatoes

Today I embarked on a new journey: canning! Well, technically I've made jam before but today we're canning this gorgeous crop of tomatoes I plucked from the garden today into stewed tomatoes. We have 3 different types of heirlooms, 2 kinds of cherry, Roma and some other kind of German heritage tomato whose name escapes me right now. Seriously, there's probably a good 8 pounds of tomatoes on the kitchen table right now. I'm surprised the heirloom plants didn't fall over, each one is so heavy!

I'm so excited!

I am also are using this beauty you see right there, our very first pressure canner. It's the little things (or maybe weird..? I'll get back to you on that one) that excite me. Seriously..this is coming from the girl who bought herself a crock pot with her birthday money and was excited about it. But I digress..

While the jars, lids and rings were happily sanitizing away in the dishwasher, I prepped and cleaned both sides of the sink (filling one side with cold water and leaving the other side empty), the pressure canner and the utensils. I kept the jars, lids and rings in the dishwasher until I was ready to use them so they stay nice and hot.

First, blanch the tomatoes, about 4 at a time, in a pot of boiling water for approx. one minute-or until the skins crack- then transferring them immediately to the pot of cold water in the sink. This is done  to stop the cooking... and so you'll be able to actually handle them without getting 3rd degree burns! Peel the skins off into the other (empty) sink and place the toms on a cutting board or bowl, something to retain all those wonderful juices!
Do this for all tomatoes. I think a normal person would use probably 20-30... Holy tomato.

 Once you've done this for all tomatoes, rough chop the toms, adding them AND the excess juices from chopping into a pot on the stove.
Bring to a boil and simmer for about 10 minutes, stirring to prevent burning on the bottom. All the recipes I looked at say to add salt, sugar, onions, celery and green peppers but since that's really for flavoring, we're just going to stick with the amazing flavor of the tomatoes because we'll be using these for so many different things in the coming year.

When the tomatoes have simmered for 10 minutes, begin transferring them to your hot jars. Make sure you have dish towels laid out on the counter, ones you don't mind getting stained, 'cause it'll get a little messy. (Turns out, the jars were cold when I was ready to pull them out of the dishwasher so I threw them into the oven on 175 for about 5 minutes.)

Using a large ladle and canning funnel, fill the quart mason jars, leaving about 1 inch of room at the top. Use a non-metallic utensil to remove air bubbles in the jars that may have formed. Then add 1 Tbs lemon juice to the top before placing the lids and rims on, securing only finger tight.

**Be careful not to touch the inside of the jars or lids with your bare hands as this can cause contamination.**


Using your handy-dandy canning tongs, place cans into the pressure canner. Use the instructions on your pressure canner.

According to our instructions, here's my really condensed, run-on sentence, version: add 3 qts boiling water to the pressure canner before placing the cans in, then secure the lid, place it over the burner on high, make sure the regulator is off, let the steam vent for about 10 minutes, place the regulator back on, wait for the valve to pop up, watch the pressure gauge until it reaches 11 pounds, drop the burner a little and set the timer for about 20 minutes.

After 20 minutes, use the canning tongs to take them out and let them sit in an undisturbed area for about 12-24 hours. Voila!


It was a long process and I learned a lot today. I think it took about 2 hours start to finish.  Totally can't wait to try the next batch now that I know what the hell I'm doing!
All in all, it was a very successful day.
I used practically every single pot and mixing bowl in the kitchen! And I haven't even made dinner yet! At least I have the day off tomorrow, I'll postpone dishes until then.

For now, I'll just enjoy my glass of wine and listen to the fruits of our labor softly popping in the background.